Tuesday, October 30, 2018

Stuffed Peppers


Ever had one of those meals that you never liked as a kid, but now as an adult you love? Funny how our tastes change over time isn't it? Stuffed peppers was one of those that I never liked- honestly can't say I ever had it as a child, but never chose it given the opportunity because it was one of those weird "grown up foods"... in that same category as brussels sprouts (another favorite of mine!)

Any who, This whole idea of back to the basics came from my husband actually. I had a rough week in the kitchen and nothing I cooked seemed to turn out right. I was wasting time trying to be creative and different and in the end I was failing.... Any one else experienced this???  (it's ok to raise your hand, no one's looking!)

He said to me, why don't you just get back to the basics. Ya know, the simple things you used to cook? They were always so good and you didn't mess them up. I appreciate you trying new things, but I really don't care about spaghetti squash....

Then it hit me- he's right. I've been going out of my way to try all these elaborate things, when really the best and most reliable are the simple basic meals.

So here we go!!!

Stuffed peppers

ingredients:
1 lb ground beef (or can be ground turkey)
1 cup quinoa
1/2 cup salsa (or 10 oz diced tomatoes)
1/2 can mixed vegetables
4 medium to large bell peppers (seeded and halved)
1 1/2 cups chicken broth

**Pre-heat oven to 400 degrees.

1. Combine 1 cup quinoa with 1 1/2 cups chicken broth. Bring to a boil, then reduce to a simmer and cook covered for 10-12 minutes.
2. When oven reaches temperature, place peppers on baking sheet (I used a deep pan with sides), spritz/drizzle lightly with olive oil and sprinkle with garlic salt or salt and pepper- your choice.


3. Cook peppers from 7-10 minutes or until they start to soften.
4. While quinoa and peppers are cooking, begin browning the beef in a large skillet.
5. When beef is done, drain and return to skillet. Mix in the vegetables and salsa, stirring until combined and warm. Transfer beef mixture to medium sized bowl. Also make sure to watch peppers and bring them out of the oven.
6. When quinoa is done, add to beef mixture and mix until evenly combined.


7. Fill pepper halves with beef filling. (You may have some left over- I did)


8. Return Peppers to oven for 10 more minutes.


9. Top with cheese if you like and enjoy!!!


Monday, August 13, 2018

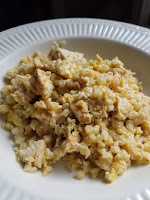
Chicken Fried Rice... or is it?

Today was a long day and a Monday.... so enough said on that... :)

Anyways, I was on the hunt for something quick and easy. I was also looking for something low carb. I'm not normally one to preach low carbs, but I'm on the LAST WEEK of 80 DAY OBSESSION, which is peak week. has a special, yet optional, meal plan to help you really finish out strong and have awesome "After" pics. So I thought, what the heck, I've made it through this entire 80 day program, lets finish it with a bang. All that to say, this special plan doesn't allow for many carbs, and I had my carbs with breakfast. (oatmeal cookie shakeology!) So proteins and veggies for dinner...


Ok have I puzzled you enough? "but you said chicken fried RICE", "there's a picture of chicken fried RICE..." Yes, its chicken fried rice.... CAULIFLOWER RICE!

Now before you turn your nose up, its actually really good! I'm not going to sit here and tell you it tastes exactly like rice and you can't tell the difference, but it has a very similar texture and an equally delicious taste you won't mind eating it instead of rice!

Now before you go thinking I'm all "extra" by making my own cauliflower rice, that didn't happen tonight. You bet I cheated, and this stuff is awesome! It's by Bird's Eye and can be found in the  freezer section of the grocery store.  Cook as directed and set aside.


Ok, up next, the chicken.... you all remember the shake and bake chicken from last night??? Well guess who made an encore appearance, just in a different outfit? Yep, you betcha! I cut it into small pieces and it got thrown in the mix! If you don't have leftover chicken, that's ok. You can grill, bake, or pan saute some and chop it up. Rotisserie chicken works well in this too, or those Tyson Ready strips work!  Be creative!!!

To actually make the "chicken fried rice" the only other ingredients you will need is about a 1/2 tbsp-1 tbsp butter 2 eggs and a drizzle of soy sauce. 

1. Melt the butter in the pan.
2. Add chicken to warm (since it was cold from the fridge)
3. Once chicken is warm, Add in the cauliflower rice and stir together. 
4. Make a small circle/ open space in the middle and crack both eggs. 
5. Let the eggs cook for a minute and then I scramble them into the rice and chicken. I continue to mix and flip and scramble the eggs, rice and chicken together until you can see the eggs just barely browning. 
6. As you're mixing in the egg, drizzle just a little bit of soy sauce over the top for that asian restaurant taste! 
- Now if you don't like this method, you can always scramble the eggs and cook them first, and then chop them up and stir them in just like you did the chicken. It works both ways! 

And there you have it! Chicken fried cauliflower rice!!! Enjoy!

As Always please feel free to leave comments, questions, or pictures of your own creations below!
If you like this and want more Fitness, Health and Nutrition, please visit my full Website!

Sunday, August 12, 2018

Homemade Shake and Bake chicken with Roasted Brussels Sprouts

Sunday. Sundays are one of my favorite days of the week. For me it's my rest day. We normally don't plan much on Sundays except for church in the morning, so the rest of the day can be used for whatever gets thrown our way! Today it was a toddler who refused to nap, so as you can imagine the laundry, yardwork, book reading, meal prep, (pick your poison) was put on hold to play with and entertain the tiny human :) 

So come dinner time I was thinking of something easy, yet healthy to whip up for dinner. I had some chicken breasts in the fridge, and the breadcrumbs were on my mind from the chicken meatballs, and viola, homemade shake and bake!

(enter Talladega nights jokes/ quotes here)

I like this recipe because it gives the chicken a great flavor and keeps it from drying out without being too heavy or breaded. 


So here we go! 

Preheat oven to 400 degrees

- 3 Large Chicken breasts (if thick you may want to butterfly them- Chicken tenderloins will work too)
- Gallon zipper bag
For the Coating:
- 2 cups breadcrumbs
- 2 tsp salt
- 2 tsp onion powder
- 2 tsp paprika
- 2 tsp sugar
- 1 tsp garlic powder
- 1 tsp ground pepper
- 1/2 tsp parsley
- 1/2 tsp oregano
- 1/2 tsp basil
- 3 tbsp vegetable oil

Mix all the dry ingredients together first then add the 3 tbsp of vegetable oil. Whisk in oil until blended and there are no clumps in the coating. 

1. Grease/coat a 9x13 glass baking dish.
2. Put about 1 cup of coating into gallon zipper bag and place one piece of chicken in bag at a time. Close bag and shake well until chicken is completely coated. 
3. Place coated piece into glass dish and continue with other pieces until all are coated. 
4. Bake in oven for approximately 20 minutes or until an internal temperature of 165 degrees is reached. 

***While the chicken is cooking***
- 1 bag of brussels sprouts
- drizzle of olive oil (to lightly coat)
- 1/2 tsp garlic salt

1. Preheat oven to 400 (can be cooked at the same time as the chicken or if you have two ovens seperately)
2. Cut the ends off the brussels sprouts and cut in half lenthwise.
3. Toss in a bowl with olive oil until very lightly coated. 
4. Sprinkle garlic salt over while tossing. 
5. Roast in oven for 15 minutes or until they start turning turning brown. 

Plate and enjoy! If you're not a Brussels Sprouts fan you can always trade out your favorite vegetable: broccoli, asparagus. Or go super easy and make a side salad!

As always feel free to leave a comment, ask questions, or leave pictures from your own creations!


Thanks for stopping by! For more health and fitness information please visit


Saturday, August 11, 2018

Zucchini Noodles and Chicken Meatballs

It's the WEEKEND!!!! And today was busy! I didn't post yesterday because we went out to eat and therefore, obviously didn't cook! But I'm back at it today. This meal was incredibly easy and budget friendly! I think total it cost about $8 and some change!


I'm always looking for healthy versions of my favorite dishes, and one of those is spaghetti and meatballs! This is a delicious and much healthier version! So I won't ramble further... here's my version of Zucchini Spaghetti and Chicken Meatballs! 

*** Preheat oven to 350 degrees***

Ingredients for Meatballs:
- 1 lb ground chicken
- 2 eggs
- 1/2 cup breadcrumbs
- 1/2 tsp garlic salt
-  pepper to taste
1. Mix all of the above ingredients together. Feel free to add any other spices/flavorings you desire!
2. Lightly grease or spray a mini muffin pan 
3. Roll meat mixture into balls slightly larger than 1 inch in diameter. They should fit perfectly into the mini muffin sections, but not stuffed.
4. Cook at 350 degrees for approximately 15 minutes or until internal temperature of at least 170 degrees is reached. 

*** While the meatballs are baking.... ***

When making Zucchini noodles you will need 1-1.5 large zucchini per person. I don't have a fancy spiralizer or anything, I simply use a julienne peeler and peel down the zucchini until you can't peel anymore. ( I know that sounds weird, but you'll see what I mean. When you get closer to the middle of the zucchini, it will break and the core won't peel as well). I normally cut up the unused part and saute it for later. 
1. Make Zucchini Noodles
2. Heat drizzle of olive oil in saute pan/ skillet
3. Saute zucchini noodles until soft, turning often and adding your favorite seasonings. I used Cavender's greek seasoning tonight, but I often use garlic salt and pepper too! 

When the meatballs are done baking, remove from pan(s) so they don't continue cooking. 
Plate with zoodles first and place chicken meatballs on top. As pictured above you can eat with or without spaghetti sauce! I has some leftover from the Portobella Mushroom Pizzas so I went ahead with it! 

Enjoy! As always, please leave questions, comments, or pics of how yours turned out!

For more things Nutrition and Fitness, please visit: www.kcclassiclifestyle.com


Thursday, August 9, 2018

Portabella Mushroom Pizza

It's Thursday!!!! Only one more day left in the typical work week!!!! Who's ready for FRIDAY????
This girl is that's for sure!

So this recipe was an impulse buy from ALDI yesterday. I was walking through the produce section trying to figure out some new and different ways to incorporate more vegetables into my meals. Then I saw the two packs of beautiful portabella mushroom caps.... hum, What creative dish can I come up with and use these???

So like any perplexed person, I consulted the all knowing GOOGLE. There were several recipes, but one caught my eye.... PIZZA!

Oh Pizza. The thing we all love, but we know isn't on the top of the healthy food list. So I thought, here goes nothing!

Portabella Mushroom pizza:

Ingredients:  (I didn't put amounts because it really would depend on the size of your mushroom cap and how many you are making, but I'm quite confident that you are all intelligent people and can figure out the proper amounts :) ) 
- Portabella mushroom cap (s)
- Pizza/ Spaghetti sauce
- Minced garlic
- Italian or pasta seasoning (basil, oregano, thyme and garlic salt mixture or something similar)
- Olive Oil
- Pepperoni (or other pizza toppings)
- Cheese

Directions:
1. Preheat oven on broil to 500
2. Mix olive oil ( I used about 2-3 tbsp for one), minced garlic, and italian seasoning together in a small bowl.
*** Now, unless you just like the earthy taste of raw mushroom, I highly suggest the next two steps**
3. Heat a small drizzle of olive oil in a pan.
4. Brush mushroom cap(s) with the olive oil mixture, then sautee in heated pan. about 2 minutes per side so that the mushroom is cooked through. Be careful, as this step will make the mushroom more delicate.
5. Place the mushroom top down onto an olive oil coated baking sheet.
6. spoon about 2 tbsp into each mushroom cap- more or less to taste
7. Sprinkle cheese onto each mushroom cap- approximately 1/4 cup per top- give or take depending on your desire of cheesiness.
8. add remaining toppings. In my case, the pepperonis. I cut mine into 4ths so they fit better.
9. Place mushroom cap(s) in preheated oven for about 7 minutes. PLEASE be sure to watch! Every oven broils differently and so you don't want your mushrooms to burn!

Enjoy!

As always, please feel free to leave comments and questions!

Also if you like these recipes, please visit my Fitness and Nutrition website for more!
www.kcclassiclifestyle.com

Wednesday, August 8, 2018

Oven baked salmon and asparagus

Happy Wednesday! We've made it half way through the week! Go Us!!!

I love salmon! It's delicious, it's healthy, and it's easy to cook!!! Plus, Fresh Market had it on sale this week, so that helps! (I'm always looking for a good deal!)

This is such a simple meal, yet it looks impressive and is amazingly healthy for you too.


For the salmon:
Pre-heat oven to 450 degrees
1. (If not already cut) Cut into 2.5-3 in pieces
2. Lightly rub with olive oil
3. Lightly season with favorite spice blends. Tonight I used Penzeys spices: Northwoods and Fox Point. If you're not familiar with Penzey's click here.

Place fish skin side down on foil lined baking sheet. Set aside and prepare asparagus.

For the Asparagus:
- I have a small counter top oven and a full size wall oven, so I was able to cook at different temperatures. If you have the availability, pre-heat second oven to 400 degrees. If not, you will place the salmon on lower rack, and after 5 minutes you will place the asparagus on the top rack.
1. Snap (don't cut) the bottom 1/2 inch off each asparagus spring. It will have a natural breaking point.
2. Drizzle/rub the sprigs with olive oil and season with your favorite seasonings. Tonight I used garlic salt and the above mentioned Northwoods from Penzeys.
3. As noted above, if you have 2 ovens place in pre heated 400 degree oven for approximately 12-15 minutes. I always check at 10 minutes and go from there. Sprigs will be sizzling, but not crispy.

After asparagus is prepped, if you have two ovens, place the salmon in at 450, and the asparagus in at 400. Cooking will take 12-15 minutes, or until salmon has an internal temperature of 125. The internal temp is important as salmon is easy to over/undercook. I highly suggest investing in a nice meat/food thermometer. We have a thermo-pen, which is AMAZING!!! If using only one oven, place the salmon on a lower rack and after 5 minutes place the asparagus on the top rack. Watch carefully as the asparagus may cook faster with the high temperature.

Plate and enjoy!!!!

As always let me know what you think and feel free to post comments, questions, and photos!

Thanks for stopping by!

Like this? Check out all my other health and fitness information and programs
www.kcclassiclifestyle.com

Tuesday, August 7, 2018

Healthy doesn't have to be hard!

Happy Tuesday everyone


I hope everyone has had a great day! Today was super busy and I honestly haven't had much time to meal prep or make a big shopping trip, but that doesn't mean I can't whip something healthy up for my family. I just have to be creative with what I have on hand! So here is today's super simple recipe!

Sausage, zucchini, and noodle bowl! Yep that easy!


I had to go to Birmingham this afternoon- which if you're unfamiliar with the geography of my area, its about 45 minutes away if there's no traffic! Anyways, that didn't leave me much time to plan or go shopping this evening. So I get home and open the fridge and start thinking about what's in there and what I can possibly throw together....

I had some chicken and quinoa left over from last night (see recipe from yesterday), a large batch of bow tie pasta I had made for my daughter's lunches this week, some chicken sausages, grapes, blueberries, hard boiled eggs, string cheese, half and onion, and some zucchini. Random right?!?

Then it hit me! I'll take the chicken sausage and zucchini and chop them up and sautee with some onion! Then I'll toss it with the pasta and sprinkle some light seasoning on it and viola! A healthy, delicious, quick dinner from stuff I already had at the house!

Ingredients:
2 aidelles Chicken and Apple sausages cut into cubes
2 medium to large zucchini cut in to cubes
1/2 onion diced
1/3 box of bow tie pasta, cooked (more or less for your preference)
drizzle of olive oil to cook zucchini and sausage
favorite seasonings!

1. cut sausage and zucchini into cubes/bite sized pieces
2. warm olive oil in sautee pan and add sausage, zucchini, and onion
3. let cook until sausage is done and zucchini and onion are soft.
4. add pasta and toss together until mixed well.
5. add seasonings and stir until pasta is warm and seasoning is mixed in.

Enjoy!!!!


Monday, August 6, 2018

Healthy Orange Ground Chicken

Everyone loves Chinese food, I know I do! But oh the calories and sodium! Leaves me feeling stuffed and bloated! Well, i believe I've found a pretty awesome alternative! May I present to you ground orange chicken! 

Note: go ahead and start cooking your choice of rice or quinoa. It will take longer than the chicken does! 

Ingredients:
1 lb ground chicken
1 tsp minced ginger (or more if you like the flavor)
2 tsp minced garlic (or more for flavor)
1/4 tsp hot pepper flakes (optional)

For sauce: 
2 tbsp rice wine or rice vinegar
4 tbsp water
1 tsp sesame oil
8 tbsp soy sauce
6 tbsp white sugar
3 tbsp brown sugar
5 tbsp white wine vinegar
Zest of 1/2 orange

2 tbsp water
2 tbsp cornstarch
(Mix above 2 together and set aside)

Directions:

1. Mix all sauce ingredients together and set aside in bowl. Mix water and cornstarch together in a smaller bowl and set aside

2. Put a little oil in pan and brown chicken, breaking up into crumbles. 
3. When chicken. Is done, mix in ginger and garlic and stir until thoroughly mixed. Add red pepper and stir until mixed.
4. Pour sauce mixture over chicken and bring to a big boil. Let boil until all chicken is covered with sauce (1-2 minutes).
5. Stir in cornstarch mixture. This will make the sauce thicken.

Serve over your choice of rice or quinoa! Add broccoli, green beans or other Asian inspired stir fry! 

Enjoy!!!!

Welcome to Kitty's Kitchen!

Welcome to Kitty's Kitchen!

I originally started this blog about 3 years ago simply to keep track of the meals/recipes that I created. So many times I would come up with something that my friends and Husband loved, but I couldn't remember later how I did it! (Who's ever been there before? Am I Right?) 

So, Kitty's Kitchen was created! If you look back in the "archives" I've still left the oldies in there just for fun! 

Fast forward 3 years, I'm now "Mommy" to a wonderful and fun little girl, and still wife to my awesome husband and best "Da-Da" a little girl could ask for! 

I'm also now a lifestyle coach for a fitness and wellness company. I've always been active/ an athlete, and loved dabbling in clean eating and nutrition, so I thought: What the heck, I'll go for it and share my love with others!

Here at Kitty's Kitchen you'll find all sorts of different recipes and meal prep ideas. You'll find I have a very random and at times eclectic taste in cooking, based on my mood, and time allowed. 

I try to serve my family well balanced meals that are appetizing and taste as good as they look. We do have a few allergies I have to work around, but that never stops me! 

I hope you'll enjoy what I have to offer here, and please never be shy to ask a question or leave me feedback on a recipe you've tried. Welcome to Kitty's Kitchen, where the door is always open and there's always food on the table! 

*** for more information about my Lifestyle coaching please visit: www.kcclassiclifestyle.com***